I have several affiliate links in both my posts and on the sidebar. All opinions are mine! Thanks so much for your support.

Friday, June 29, 2012

Circle lattice designs

I designed these several weeks ago, I had originally intended to use them as mats. But I think they would also work as candle wraps or paper napkin rings.
The design is simple - just connected circles but it took me a while to get the pattern even. I used the duplicate feature to help with the spacing. It is almost a circle lattice.
The design started out this with a circle in the middle. It would be a nice vinyl stencil for etching but of course the circles fall out with paper.  BTW, this is a pain in the patootie to get all those little pieces of leftover paper off you mat!
Her is what the candle wrap looks like.

You can download the lattice patterns here (free for the next few weeks).

You can download the candle wrap here (free for the next few weeks).

Did you see the latest Chillin' releases at Lettering Delights? They are only available on check-out, so grab a freebie and see if you like them (use the try it now to see all the designs in the set).


Friday FReebie for Kuly 4th

Cake toppers and bottle wraps! Free for July 4th,

And check out the new Rockets releases while you are there.
I love the use of the 2 different blues!

Free Labels 03 (MTC) file

No surprise - I love to think I am organized by labeling my things. Not that I am really organized, but I like to pretend that I am trying.
(Yes, this photo was posted before, you are not dreaming!)
I offered these lables previously and while I really like them, I thought that I would try a few other designs. Here is one for you.
Lest anyone think I just pixel traced the labels, let this file assure you that I did not.  Here are the shapes I used, before welding, joining, etc. So if you would like to try your hand at some different size labels, you are welcome to use these shapes for experimenting (they are just from Basic Shapes).  The font used in the last label is Eurostile Extended. I did alter it a bit to make it a stencil-like alphabet, and I have included the altered letters in the file (I only used caps). I purchased a large roll of Black Contact Paper from Amazon that I am using for these labels (and so much more!)  (BTW, I checked prices and found Amazon to be the best buy - unless you are lucky enough to find some locally).
These labels are also great for use with Chalkboard Vinyl and there is no need to personalize them before cutting (much easier) - just cut out a bunch and label them afterwards. If you plan to use use regular chalk, then go ahead and get the special Chalkboard Vinyl, but if you plan on using the Bistro Chalk Markers then just use the black contact paper from the above link - it works great with these markers. The Bistro markers are wet-erase so you can change the labels whenever but only when you want to (like if you think your printing stinks and your friend comes over and you talk her into printing them out). They do not dry erase. You can download the free MTC file here for the next few weeks.

Just a note - neither the Bistro markers nor regular chalk work well with shiny black vinyl.Ask me how I know.

Tuesday, June 26, 2012

Paper Hoopla Bundle - too good not to post!

I have not been posting all the FB specials at LD (someone complained that I was an advertisement for them) but today's bundle is just to good not to post. 100 different digital papers for just 0.10 each! How can you beat that price? Even with Dollar Days, they were still about 0.20 each, so this is a great deal.
Offer is good until Tuesday night - grab it while it's available!

Monday, June 25, 2012

Coffee jar decal

I store my coffee in glass jars - I feel that they keep fresher this way (and I can reseal these jars with my FoodSaver like this if I don't plan on using them for a while). All I wanted was a decal to distinguish the regular coffee from the decaf.
Ever notice that it is really hard to get a good photo of a glass object?
I used an image from Coffee or Tea as my starting point - the frappe one (since that is how I like my coffee the best).
I added a "D" for the decaf and flipped the other for the regular coffee. That's it! The shadow and the lines just make for easier weeding - not needed but something I like to do. I cut this from  a beige print (marbled) contact paper (I think I may have picked it up at Target).

I've been into storing and labeling items recently - I have been using the label that I designed for most everything but I thought this would look better (and the other items are in my craft room while this is in the kitchen). Just a nice change of pace.
I've been using the Dolar Tree containers  but to make them work well in my craft room (black and white accents) I am slowly spray painting the tops black with Krylon Fusion Spray Paint in satin black. I think I have painted 10 so far and I still have paint left to do some more.  I really like how it changes how the look - and really helps to mash with the room decor. A little OCD perhaps, but it's my OCD, so I can live with it.  

Saturday, June 23, 2012

A freebie and stick figures for vinyl decals - now available at LD!

OK, we asked for them and now they are here - the Stringbeans! They can be used for vinyl decals for your car, van, or just anywhere. And there are plenty of them - one is sure to fit your needs. 


And don';t forget to pick up the Friday Freebie - the Stringbean dogs!

Friday, June 22, 2012

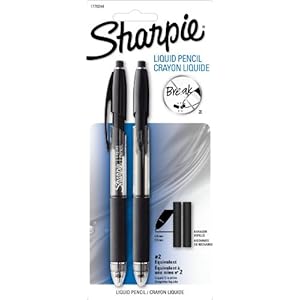
Sharpie Liquid Pencils

(Disclaimer: this is a personal review of this product; I received no products or compensation for the review. Opinions are 100% mine.)
This is a rather unique product. It is actually a pen with a liquid graphite ink that is initially erasable. I purchased it (at Hobby Lobby) in a set of two for about $5. It is also available at Amazon for $9.99  for a set of 12 (Sharpie Liquid Mechanical Pencils free shipping). If you think you will be using them much, this would be a much better buy.  You can also purchase Sharpie Liquid Pencil Refills, although it is actually cheaper to buy more pencils. 

I read the many reviews and many people commented that it did not write smoothly and it skipped a lot. I found this to be true at first. But several reviewers commented that the pencil did need some priming before the first use. After scribbling for about 30 seconds to a minute, the ink was smooth and even. I used it to draw an svg image in the Cameo and it was smooth the entire time. I think it took almost 10 minutes to finish the sketch so that was a lot of smooth, skip-free writing. My sample svg was the cow skull from Rustic Sketches
Sharpie states that the ink becomes more permanent after the first 24 hours but other reviewers found this to not be true. I agree with this; consider it a pencil that will probably always be erasable. Speaking of erasing, the lines erased cleanly with the included eraser. There were 4 additional erasers included in the package. 

Do I recommend this product? Yes, I do; it worked very well in the Cameo (I used a Hot Paws Pen Tool to secure it in the holder) for this project. I have not used it extensively for regular pencil use so I cannot speak well to that.

Wednesday, June 20, 2012

50% off sale at LD for one day...

....on a purchase of $12 or more.  This sale is too good to pass up!
Celebrate the first day of summer with Lettering Delights by saving 50% on any purchase over $12!

Coupon code: SoakUptheSun.  Offer ends Thursday 12 midnight MST.

Saturday, June 16, 2012

Friday Freebie (Father's Day) at LD

The great thing about this freebie is that they are pngs that can be printed out in almost any graphic program. You don't need a cutter, just hand cut and assemble them.

Father's Day tiles - ready to go! (and a free MTC file)

Just to prove that I did manage to get the tiles sealed, I have a picture for you. I used a gloss varnish so they are all ready to go - just need to be wrapped by the girls. In case you missed the post about making the tiles you can read it here.

I was planning on using this bag but the tiles are just a bit too big so I adapted that file for the tiles. We will wrap them in tissue paper and then top the wrapping with this.
The idea is that they will be able to write something on the handkerchief tag and tuck it into the pocket.
The pockets are held in place with tabs that allow it to slip into the shirt.
I have a free MTC file for you if you would like to recreate something similar.
Download the free MTC file here through the end of the month.

Sunday, June 10, 2012

Photo Coaster tiles (what the Pink Girls made for their Daddies for Father's Day)

Time is running out! Father's Day is next Sunday and I am off to Chicago-land this week (a sister hospital is changing to a new EMR and I am a Super User for the system so I will be there to help out with the GoLive) so I can not work with the Pink Girls with crafting on Wednesday after church. So I hurriedly revived this old craft for them, took pictures of them this am, and had them write their comments this pm at church (One Pink Girl is missing - if you do not come to Sunday School = you do not craft with Nelda. Moral of the story: do not skip Sunday School!) I will actually be doing most of the crafting this time around because of my trip out-of-town.
I picked up these tiles previously on clearance at Lowes . I have found (like another blogger stated) that Lowes have the best selection of tiles and the lowest prices - at least for what I am looking for. I checked both Menard's and Home Depot as well. These gold tiles were on clearance for 0.10 each, they normally run about 0.34 each - still a cheap project. I liked the beige ones best but it was too hard to pass up on the clearance so that is what I used for this project.  (and the gold matched the background better as well). I really like the edging on these tiles, I think it is uber cool looking!  Like we chiseled it out of stone or something just for the daddies.
Here are the scu numbers in case that helps you. I am not sure that the gold ones are still available though.

Take your pictures and print them out using whatever program you have. I used PSE and cropped them to 4" x 4" then printed on regular thin printer paper. Let them dry until the paper will tear well. Tear, burn or cut around the edges just a bit smaller than the size of the tile itself - whatever floats your boat. I tore. It is sometimes hard to tear well - but that is part of the charm so just make it look good to you. The person here did some cutting and inking.
Put glue on the back (I did not use Mod Podge but you could). I found that a thin layer worked best for me but give it a try and see what works best for you. Too much glue made my paper wavy to I tried to be a bit stingy with it.  Apply photo to tile, centering as you desire.

WAIT UNTIL IT DRIES COMPLETELY.

Otherwise the next step will not go well. Ask me how I know.
Have your Pink Girl use a PERMANENT marker to add a sentiment for her daddy. Mistakes, misspelling  and all, he will love it. And as you can see here individuality is not a desired trait for this group! They are a clique of their own and dare not break form from each other! So a bit of copying is OK, just make sure it something from their heart. And they have varying degrees of legibility as well - the best cursive writer here is actually the next to the youngest. And the only one not home-schooled. (I am not against home-schooling per se but I'm just saying that there may be some positives about schooling in a structured environment.)

And BTW, I did not pose them for the pictures above, they posed themselves. And they were against the same background, same lighting, photos taken within minutes of each other and yet the background looks completely different in each photo, what's with that?
Let the marker dry well. Now add some felt pads (I got the small dark brown ones at the Dollar tree and the larger ones at Walmart) to the corners.
The adhesive is not perfect so you might want to add a touch of tacky glue or hot glue to secure the felt well. Ask me how I know.

Now spray the front with a clear adhesive - this sets the printer ink so that it does not smear. When dry, coat with either more spray adhesive or a brush-on sealer (you could use Mod Podge, I will use Triple Thick). I don't have pictures of this because I have not done it yet!  I always do 2 coats of Triple Thick and I like to let it dry a week before use. It will be dry on the surface but maybe not all the way through so give it some time. You are then ready to wrap and gift!
Of course, now my project will not fit in the bag that I had already designed for them (I was considering photo buttons and that bag was a perfect size for them). So now we need a new wrapping solution!

Saturday, June 9, 2012

Dollar Days and Deals for Dads

Dollar Days for files related to boys or dads - about 400 files in all! 
So hop over and see what they have that you may be able to use - at this price you'll want to grab them while you can (image above is linked). Don't forget to pick up some files for your Father's Day projects. 

Friday, June 8, 2012

Friday Freebie at LD - just in time for Father's Day

(image is linked)
Hurry over to grab this freebie! 

Tuesday, June 5, 2012

Getting ready for Father's Day

I'll be doing some crafting with The Pink Girls for Father's Day - just not quite sure yet what. But I did get started with the gift bag. I saw
these on Pinterest and decided to design my own in MTC. But before I could, angelb (from the MTC forum)
posted one that she was sharing. But I needed one more proportioned like a lunch bag, so I went ahead and designed my own. My bag is 3.5 x 4.75 x 1.5" (w x h x d).

OK, a little bit of cheatin' goin' on here - I wanted the design to be as big as possible on an 8.5 x 11" paper so I did not want to use PnC (the reg marks really eat into the design area).
So I made my design and then made a thick shadow around it and filled it with a pinstripe texture (that I designed and is included in this file). I kept the actual cuttable design white. Using this method you may even be able to get a decent Print-n-Cut with a cricut. I can assure that it works very well to get a larger design with a Cameo!
I drew the ties myself - I started with the pentagon shape and then did some node-editing magic (thank you so much, Andy, for adding node editing to MTC!) and voila! a tie appeared. I wanted it to be proportional so I actually designed it on the front page and then moved it to the second page for PNC (in the same cheatin' way!). I even cheated and punched out the tie tacs (the round things) with a punch - shame on me! (I found the saying "World's Best Dad" on google. I was not able to find any copyright info so I am not including it in the file. You can always make up your own or google it yourself).
I took the image into PSE and changed the light teal blue to a blue that matched my bag and tie better.
OK, bear with me and my funny looking flaps. I am trying to find the perfect bottom flaps - ones that will allow the bag to be closed without glue. This is not perfect but I.am.getting.close! You can see how I designed the flaps so that they interlock when closed. I know they look at little different...odd.....peculiar.....bizarre?? Not sure what to call them! But they do the job.

Here's how it works (excuse the photos of my left hand - yes I am missing fingers but there was no other way to get the photos so you will have to overlook my hand)

First side flap inserted.....
 ...starting to insert the second flap....
 .....second side flap inserted.....
 ....inserting the last flap
...the result...a nice tailored-looking bottom that is relatively secure - and without glue!
The flaps can be pulled out and the box/bag can be stored flat. The only glue needed is for the flap that attaches at the side. And of course any embellishments.
Pop the flaps back in and there you have it - A favor or treat bag fit for a king the World's Best Dad!
Waiting to be filled....got any good ideas? The Pink Girls are 8 and 9 years old, and one is very craftily-challenged. We will have about 10-20 minutes to complete the craft after Wednesday service so I have to find something quick, cheap, and easy! And of course, memorable for a dad.

Would you like to try this bag yourself? I have the bag available (free!) until June 25, download here. (And yes, it is the third revision of the file - I was really working on that bottom flap thingie).

As always, God Bless, Happy Crafting, and I would love to see what you make with my files!

And if you didn't see the latest specials from Lettering Delights (I know there are a few who don't "do" FB), here they are.